|
H T M L G u i d e
The Ultimate Reference Guide to Hypertext Markup Language |

|

|
| 1. Getting Started | 2. HTML Tags | 3. Minimal HTML Document | 4. Page Options | 5. Character Formatting |
| 6. Lists | 7. Hyperlink to URL | 8. Including Images | 9. Images, Sound & Animation | 10. Client-Side Image Maps |
| 11. Meta Tags | 12. Tables | 13. Forms | 14. Frames | 15. NOSCRIPT |
|
|
|
Getting started with HTML documents
This guide assumes that you:
Helpful Terms
|

|
|
|
HTML tags consist of a left angle bracket (<), a tag name, followed by a right angle bracket (>); tags are usually paired to start and end the tag instructions; the end tag is identical to the start tag with a slash (/) preceding the text within the brackets; some elements may include additional instructions, called attributes, in the start tag to specify the position of the content.
Basic HTML Tags
<HEAD></HEAD>
<TITLE></TITLE>
<BODY></BODY>
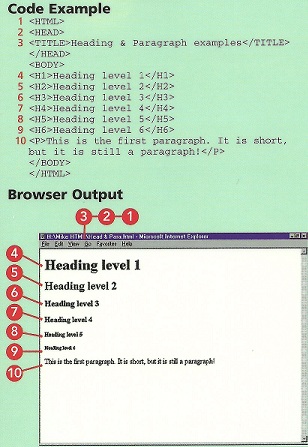
Headings <H1></H1> through <H6></H6>
Paragraphs <P>
Preformatted Text <PRE></PRE> This tag makes spaces, line breaks and tabs appear in the same location as the source file; this is useful for displaying program listings. Note: The <PRE> tag can be used with the WIDTH attributel this specifies the maximum number of characters for a line.
Extended Quotations
Horizontal Rules <HR>
Forced Line Breaks / Postal Addresses
|
| MINIMAL HTML DOCUMENT |
|
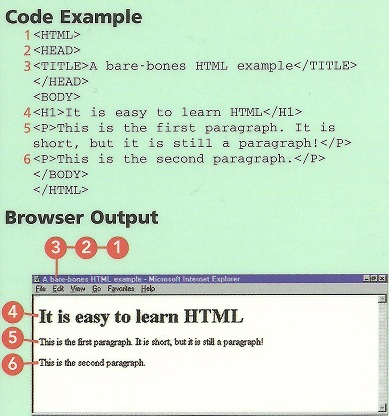
Every HTML document should contain the basic HTML tags; the head contains the title and the body contains the text that is made up of paragraphs, lists, images and other elements; not every browser supports all tags; however, the brower ignores the tag if it is not supported. Note: HTML is not case sensitive. <body> is equal to <BODY> or <BoDy> and it is industry standard practice to code HTML in either all caps or all in lower-case (personally I prefer all caps) so as to distinguish code elements from regular text embedded between it...also, (to make it easier on the eyes for not only yourself but possibly other programmers), you should place each tag on a separate line: This makes it easier to read but makes no difference to the browser (meaning while I do NOT recommend it, you could put all code and text in one big cluster or chain/string which makes editing painful on the eyes). Required elements shown in this bare-bones example:
|
| PAGE OPTIONS |
|
Page options are included as attributes of the <BODY> tag.
Background image
Note: Using a background image instead of a background color warrants a discussion on industry standard practice (albeit Mac or Windows OS), as some people are color blind or have difficulty distinguishing between particular colors. For that reason, most programmers are taught early on that the idea is to design so that as many users and visitors as possible use and visit your pages and programs, therefore, notice some of the most heavily visited sites on the Web: Google, Yahoo!, Facebook, Microsoft, Weather.com, Apple.com, and the list goes on...notice that they all use a white background color (not on image), and mostly stick to using black text (like pages in an actual book), with very few images (and those images are mostly inanimate), virtually no embedded background sound, and possibly a medium blue or medium red colored text for links (which are also in bold type and mostly likely underlined). This might be boring, but you must consider which color text goes with certain backgrounds, so that the text is not 'lost' in a way that cannot be seen. If you do decide to use a background image, I strongly suggest finding an appropriate (and by that I mean something that has to do with the theme, or subject content of your page) pattern, as all browsers tend to tile such images by repeating them left to right, top to bottom...if you want to display a picture, then embed it into the page, not on the page as wallpaper! Also, I find that humans were not meant to sit and stare at screens for most of their days, so a white background is too much on my eyes (after long periods), so you might consider a light to medium grey background color, or a teal background color...but then you must consider which colors of text can be seen against such backgrounds, such as yellow or gold. Personally, I have always been a huge fan of using black as a background color as it not only reduces glare, but is much easier on the eyes for extended periods and is much better for the user's screen as black is the color of the screen when the computer is turned off. In addition, I find that most colors (except for black text, obviously) stand out much better against a black background.
Background, Text & Hyperlink Colors
Note: There are three different possible colors for hyperlinks: If a link (a.k.a. 'anchor') has not been visited yet by the user, then you set its color with the LINK attribute. If the user's mouse is hovering over a link (or in some cases, using the Tab keys to send the focus to the next hyperlink on the Web page), then it is considered an 'active link' (ALINK), therefore you could assign it a different but similar color to sort of 'highlight' (e.g., the hyperlink will return to its normal link color as per the LINK attribute once the user moves their mouse away from it or presses their Tab key...so an example would be a hyperlink of text that reads, 'Click here for the next page' with a LINK color of purple and an active link color of magenta; likewise you could alternate between a red LINK and a pink ALINK, or even between BLUE and LIGHTBLUE, etc.). If the page that the link anchors to has already been visited (even if the user did not get there by clicking this hyperlink), then it is considered a 'visited link' and should therefore have an appropriate color...I suggest something darker than the colors for LINK and ALINK (perhaps three shades of blue between LINK, ALINK, and VLINK if those colors fit your theme...)
Example: For a black background, silver text, and white hyperlinks:
Note: The six digit number and letter combinations represent the amount of RGB (red, green, blue) color as hexadecimal values from 00 to FF; 000000 is black, FFFFFF is white; finding a specific color using these number and letter combinations can be cryptic...that is why I recommend looking up 'HTML hexadecimal color codes' in Yahoo! or Google, bookmark the page, or, you can type the name of a color between the quoation marks, such as "BLUE" or any other color name.
|
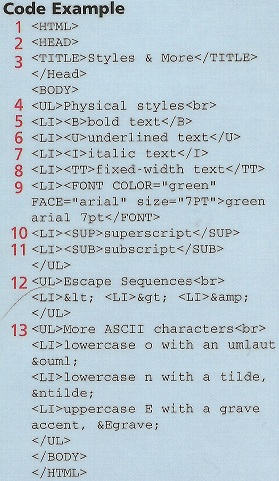
| CHARACTER FORMATTING |
|
Physical Type Styles
Character Entities
An escape sequence must be used instead (and again, I suggest searching 'HTML character codes' in Google or Yahoo! and bookmark the page for future reference):
Comments in Code
To view the source code for any Web page, then go to File...View Source. If this is not currently visible in the browser, then right-click on the page and from the context menu, choose View Page Source. In a separate window will appear the code that makes up that Web page! Use this to your advantage: Equipped with the knowledge provided in this guide and the source code from any other page, you can easily determine where certain image and media files are located, or you can copy the code and paste it into a text editor for your own use! As per the founders of Microsoft and Apple, 'Good artists copy, great artists steal!' Why re-invent the wheel? Skilled programming is all about efficient use of time and eliminating redundancy--hence, copy and paste!
You can begin inserting comment tags anywhere between the opening <HTML> and closing </HTML> tags. Why? Not so much for other programmers' benefit, but for your own future understanding: Imagine spending a lot of time and energy creating a Web page, and several months later you are staring at its code wondering what particular elements of it even mean! Thus, comments are necessary to
explain...below is an example:
Note: So, obviously comments can extend to more than just one line...and they begin with <!-- and close with --> and the browser ignores everything in between, so that the user does not see this.
|
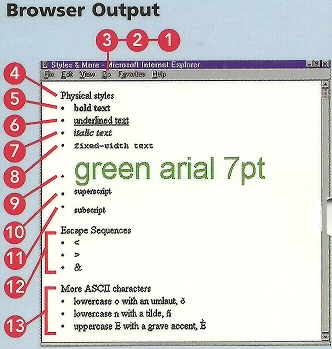
| LISTS |
|
HTML supports unnumbered, numbered and definition lists:
Note: No closing tag </LI> is required.
Numbered Lists / Ordered Lists
Definition Lists <DL></DL>
Nested Lists
|
| HYPERLINK TO URL |
|
Hypertext links: the areas (graphics or words) in an HTML document that cause another document to be loaded when a user clicks them. The ability to link text and images to another document is a major capability of HTML.
When an HTML editor specifies text as a hyperlink, the color of the text will be changed to a bright blue; bright blue is the default hypertext color; to change the default color this line must be added to the HTML document after <HEAD>
Linking to a Web page
Linking to a specific page on a Web site
Links between specific sections of different documents
Links between specific sections within the current document
Links to Email
The following example shows how you can use the Mailto tag to not only anchor to an Email address, but also to include a carbon copy (cc) and even a pre-formatted subject as well as some automatic content to be included in the body of the Email (in case visitors just want to click and not type anything in order to respond).
To add a carbon copy, just add ?cc= after the Email address in the anchor followed by the Email address of the recipient of the carbon copy.
To add a pre-formatted subject, just add to the string already in place by typing &subject=
For each word in the subject, you continue by adding the first word followed by %20 (although you do not add %20 after the last word).
For some automated text to appear in the body of the Email, simply continue the string of text by adding &body= (and for each word after the first word, type %20 before it); and do not forget to end this string of text
that is still an anchor by typing " at the end!
Example:
Note: Most people today use webmail-based Email accounts, meaning they connect to a website and log-in to access Email (unless they are at work and/or they use actual Email clients such as Microsoft Outlook, which usually comes bundled with Microsoft Office and therefore is not free but the software is stored on your computer). This means that using the Mailto tag forces the user to click on the anchor which does not link to a website but instead opens the default Email server on the user's computer (which again, if you are a Windows user, would most likely be Microsoft Outlook), and this is probably not the preferred method of choice by the user. So as opposed to tying your name between the anchor tag and its end tag (or something like 'Click here to Email me'), you should instead type your actual Email address, so the visitor can at least copy & paste that text into their Email...more on formatting the subject and body contents when I discuss forms further on this page. In the meantime, I suggest having a hyperlink to each of the major webmail-based Email client/servers, such as Yahoo! Hotmail, and Google (gmail). This way, the user can log-in...
Links to Images
<A HREF="http://www.neilsite.net/images/portrait.gif">
|
| INCLUDING IMAGES |
|
Including Images <IMG SRC>
Example: To include a company logo image, enter: <IMG SRC="http://www.domain.name/directory/subdirectory/company_logo.gif"> Note: There is no end tag for the IMG tag.
Size Attributes
<IMG SRC="logo.jpg" WIDTH="115" HEIGHT="120">
Note: Image size can be found in a number of ways. First of all, it is always expressed as WIDTH x HEIGHT in terms of pixels. For example, find an image located on your computer and click it just once and allow the mouse pointer to hover over it...a caption should appear that tells you what type of image it is (e.g., JPEG, GIF, etc.), its dimensions (e.g., 115 x 120), and the size of the file (e.g., 25KB). Of course, Windows users can also see this information from the status bar when in Windows Explorer. Another way to determine the dimensions is to open an image software program (all versions of Windows include Paint, found by clicking Start...All Programs...Accessories) or Adobe Photoshop (this is not free). Such programs not only show basic info about the image (such as in the status bar in Paint), but allow you to resize the image for thumbnail purposes, or even to rotate it, flip it vertically/horizontally, stretch/shrink the image, add text to images, change their file type (e.g., formatting from .gif to .jpg). This is important because while all of the 5 major browsers support various image types, earlier versions of these same browsers (if viewed on an older computer, for example) do not support various file types. Therefore, I almost only ever use .gif or .jpg and not as much .bmp (Bitmap), .ico (Icon), and even more recent, .png (which is supposed to allow 'transparency' of background as well as adjust to any stretching/shrinking of dimensions so that the pixels do not display a distorted image), as compatibility between Mac and Windows users of various browsers (especially on use of mobile devices and older systems) seems to be an issue...Also, viewing an image directly on the Web (by typing in the location of it in the address bar) usually will tell you its dimensions in the title bar of the browser. Of course, you can right-click and from the context menu, choose 'Save Image As...' (or Copy) to obtain images on the Web for your personal use. But beware of copyrighted material! (Either the image will be protected so that right-clicking will be disabled in some way or there will be copyright info on that page). Obviously, you will need to know the full path (location) of an image before you use the IMG tag.
Alternate Text for Images
Aligning Images with Text
Note: Another attribute of the IMG tag is BORDER: In some cases, browsers will automatically place a thin border (like a frame) around your image. This may be especially undesirable for logos that are not square or rectangular in shape, or the default border color clashes with those of the image. Therefore, you can specifiy the thickness of the border, in pixels:
Images without Text
|
 Default, the bottom of the image is aligned with the text
References